Monday, June 8, 2015

Raspberry Pi and Wi-Fi dropout problem

Wi-Fi connection gets dropped quite often. I have Wi-Pi adapter that has Ralink rt2800us chipset (you can find tests of different adapters here). You can confirm this from dmesg:
$ dmesg | grep rt2x00
[ 5.800208] ieee80211 phy0: rt2x00_set_rt: Info - RT chipset 5390, rev 0502 detected
[ 6.134049] ieee80211 phy0: rt2x00_set_rf: Info - RF chipset 5370 detected
[ 18.272745] ieee80211 phy0: rt2x00lib_request_firmware: Info - Loading firmware file 'rt2870.bin'
[ 18.275301] ieee80211 phy0: rt2x00lib_request_firmware: Info - Firmware detected - version: 0.29
Now, how can we improve Wi-Fi stability? First, you can disable the power management of the Wi-Fi adapter. However, you can also write a script that will ping something, say, every, minute. Check power management:
$ iwconfigwlan0 IEEE 802.11bgn ESSID:"***********"
Mode:Managed Frequency:2.447 GHz Access Point: F4:EC:38:CA:D9:88
Bit Rate=108 Mb/s Tx-Power=20 dBm
Retry long limit:7 RTS thr:off Fragment thr:offPower Management:onLink Quality=55/70 Signal level=-55 dBm
Rx invalid nwid:0 Rx invalid crypt:0 Rx invalid frag:0Tx excessive retries:0 Invalid misc:1 Missed beacon:0
Disable power management as follows if enabled:
$ echo “wireless-power off” >> /etc/network/interfaces
You can also try to keep the connection alive. Add crontab job /usr/local/bin/reconnect-wifi.sh that will check Wi-Fi state every 5 minutes:
#!/bin/bashifconfig wlan0 | grep -q "inet addr"if [ "$?" != 0 ]; then ifup --force wlan0fi
Add new job to crontab. Open your crontab:
$ crontab -e
and add this line at the end:
*/5 * * * * root /usr/local/bin/reconnect-wifi.sh >> /var/log/syslog 2>&1

Saturday, May 9, 2015

Improving working lighting

Recently I decided to improve my working lighting. For this purposes I bought 10W LED projector. But it turned out it has pretty low quality and has a few issues: overheating and flickering. It was decided to improve both.

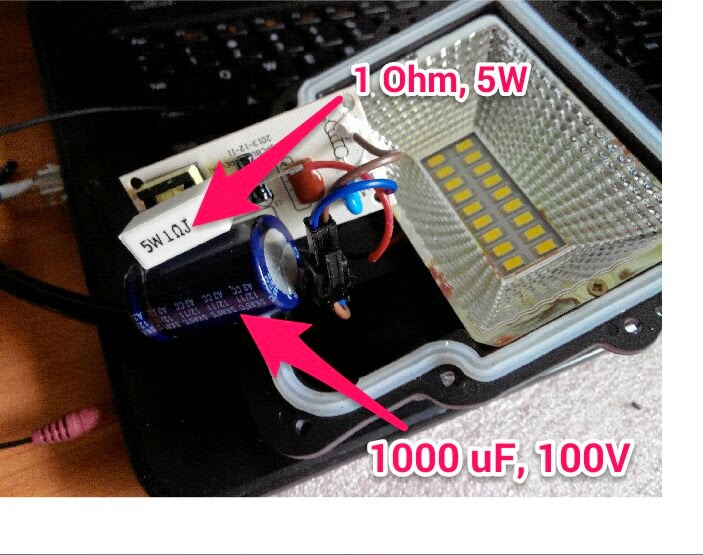
To improve flickering I replaced original 120uF, 100V output capacitor with 1000uF, 100V capacitor (I would put 2000uF there but I was have to rewire everything inside even for 1000uF to fit it). Be very careful with high voltage capacitor, this circuit doesn't have discharge resistor.


To reduce hit a bit from LED matrix I put 1 Ohm, 5W resistor. It also would be nice to replace heat sink with a bigger one.


To fit everything inside was quite a challenge. Now testing. The following images show original and improved lighting respectively (and yes, video would be better):


Saturday, April 25, 2015

Cross-Compiling for the Raspberry Pi: distributed compilation

So far I've been trying different cross-compiling techniques: QEmu, Scratchbox and Raspberry Pi tools. But I should say, they didn't work for me. Just try to build something as big as GStreamer and you will get what I'm saying.

The new approach that I'm heavily using right now is distributed compilation. It allows you by just launching the make command, having your remote PC working instead of your Pi, and a few seconds later having your program/library compiled just as if everything happened on the Pi itself.

1. Configure slaves: install distcc and configure it. Figure out how many processors you have available on the machine(s) and how many of those you would like to share. Start slave as follows (or configure it as a daemon):
$ distccd --user nobody --jobs 8 --allow 192.168.1.133 --verbose --log-stderr
2. Configure Raspbian master: install distcc and configure it. Edit /etc/distcc/hosts and comment out the line with +zeroconf. Add space-delimited list of slaves on your network.

3. Compile it! Edit PATH so it uses distcc instead of the local compiler:
$ export PATH=/usr/lib/distcc:$PATH
$ which gcc
Start compilation process.

UPDATE: very important thing that I forgot to mention. Before running distcc on your slave machine you will need to install Raspberry Pi tools and update PATH as follows:
$ export PATH=$RPI_TOOLS/arm-bcm2708/gcc-linaro-arm-linux-gnueabihf-raspbian/bin:$PATH

Friday, December 19, 2014

Cross-Compiling for the Raspberry Pi

It's not cost-efficient to develop and compile on the Pi itself. Instead, you would probably to develop and compile on your multi-core development system, then transfer the binary over to the Pi and test it there. To do this, you need a set of tools, a toolchain,

The following steps describe how to create a no-compromises Raspberry Pi toolchain on Ubuntu 12.04 using Crosstool-NG.

1. Install dependencies

Run the following command to install the required packages:
$ sudo apt-get install gawk bison flex gperf cvs texinfo automake libtool ncurses-dev g++ subversion python-dev libexpat1-dev cmake
2. Download, build, and install Crosstool-NG

Crosstool-NG isn't available in the standard Ubuntu repositories. Run the following commands to download, build, and install it:
$ pushd ~/raspberry_pi/build
$ curl -O http://crosstool-ng.org/download/crosstool-ng/crosstool-ng-1.18.0.tar.bz2
$ tar xf crosstool-ng-1.18.0.tar.bz2
$ cd crosstool-ng-1.18.0
$ ./configure --enable-local && make && make install
$ export PATH=`pwd`:$PATH
$ popd
3. Configure, build, and install the toolchain

Crosstool-NG comes with a tool called menuconfig that makes it easy to configure how the toolchain should be built. Run the following commands to launch menuconfig, then follow the sub-sections below to configure the toolchain build parameters:
$ pushd ~/raspberry_pi/build/toolchain
$ ct-ng menuconfig
Setup Path Options
  • Navigate to Paths and misc options.
  • Enable Try features marked as EXPERIMENTAL.
  • Set Prefix directory to ${HOME}/raspberry_pi/toolchains/${CT_TARGET}.
  • Enable Use a mirror.
  • Set Number of parallel jobs to twice the number of HW threads.
Setup Target Options
  • Navigate to Target options.
  • Set Target Architecture to arm.
  • Leave Endianness as Little and Bitness as 32-bit.
  • Set append ‘hf' to the tuple (EXPERIMENTAL).
Setup Operating System Options
  • Navigate to Operating System.
  • Set Target OS to Linux.
Setup Binary Utility Options
  • Navigate to Binary utilities.
  • Set Binutils to 2.22.
Setup Compiler Options
  • Navigate to C compiler.
  • Enable Show Linaro versions.
  • Enable C++ support.
C-library
  • Set eglibc version to 2_13.
Setup Debug Options
  • Navigate to Debug facilities.
  • Enable gdb, then press [Enter] to configure additional GDB settings.
    • Enable Build a static cross gdb.
    • Set Cross-gdb extra config to --with-expat.
  • Enable ltrace.
  • Enable strace.
Exit and confirm to save the configuration file returning to your shell.

4. Build the toolchain

We are now ready to build and install the toolchain. Start the build by running the following commands:
$ ct-ng build
$ popd 
If the build was successful, the toolchain will be located at ~/raspberry_pi/toolchains/arm-unknown-linux-gnueabihf/. All the tools (gcc, ld, gdb, etc) are located in the bin/ directory of the toolchain with the name of the toolchain prefixed.

Run the following command to add the toolchain binaries to the PATH environment variable:
$ pushd ~/raspberry_pi/toolchains/arm-unknown-linux-gnueabihf/bin
$ export PATH=`pwd`:$PATH
$ popd

Monday, November 24, 2014

How to print a cog without 3D printer

For one of the projects I have 3D printed stepper-driven tank platform. However there is one cog missing because the original one doesn't fit to my motor shaft.

Unfortunately on this moment I do not have an access to 3D printer and was have to find a way around to make this cog. I decided to try oven bake modelling clay with procelain finish.

I made a print of original cog and motor shaft on the peace of clay and cut it with x-acto knife. Then I baked it for a 15 minutes with ~115*C. It's really strong, you cannot break it with hands. However you have to be very careful and do not overheat it:

It looks and works pretty well. No complains so far.

Tuesday, May 13, 2014

Stream video/audio from Raspberry Pi

  1. Stream audio with vlc:

    Raspberry Pi
    $ cvlc -vvv alsa://hw:1 --sout '#rtp{sdp=rtsp://:8554/}'
    Desktop
    $ vlc rtsp://raspberry-pi:8554/

  2. Stream video with vlc

    Raspberry Pi
    $ raspivid -fps 25 -g 240 -o - -t 0 -b 1500000 --vflip -w 1200 -h 600 | \
    cvlc -vvv stream:///dev/stdin \
    --sout '#standard{access=http,mux=ts,dst=:8090}' :demux=h264
    Desktop
    $ vlc http://raspberry-pi:8090/

Saturday, March 15, 2014

PropGCC and Raspberry Pi

1. Install makeinfo.
$ cd ~/tmp/
$ wget http://ftp.gnu.org/gnu/texinfo/texinfo-4.13a.tar.gz
$ tar zxvf texinfo-4.13a.tar.gz
$ cd texinfo-4.13
$ ./configure
$ make
$ export PATH=$PATH:~/tmp/texinfo-4.13/makeinfo/
2. Install Raspberry Pi cross compiler.
$ mkdir ~/rpi
$ cd ~/rpi
$ git clone git://github.com/raspberrypi/tools.git
$ export PATH=$PATH:~/rpi/tools/arm-bcm2708/gcc-linaro-arm-linux-gnueabihf-raspbian/bin/
3. Build and install PropGCC.
$ cd ~/tmp/
$ hg clone https://code.google.com/p/propgcc/
$ cd propgcc
$ make CROSS=rpi
The output is in /opt/parallax-rpi.

References:

Saturday, February 8, 2014

Pinout for HYDRA SD Max Storage Card


The pinout for the HYDRA SD Max Storage Card:


SD card interface:

PinNameDescription
1I/O_0DO
2I/O_1CLK
3I/O_2DI
4I/O_3CS
143.3V3.3V
20GNDGND

Also see Table 2.0 from "HYDRA SD Max Storage Card User Manual Sample" for more details.

Wednesday, January 15, 2014

Virtual Raspbian on QEMU in Ubuntu


How to run virtual Raspbian on QEMU in Ubuntu:

1. Compile QEMU for ARM (1176).

$ sudo apt-get install git zlib1g-dev libsdl1.2-dev libpixman-1-dev
$ cd tmp
$ git clone git://git.qemu-project.org/qemu.git && cd qemu
$ ./configure --target-list="arm-softmmu arm-linux-user" --enable-sdl --prefix=/usr/local
$ make
$ sudo make install
2. Prepare QEMU environment and raspbian image.
$ mkdir ~/qemu-vms/ && cd ~/qemu-vms/
Download Raspbian Wheezy from http://www.raspberrypi.org/downloads and Linux kernel for QEMU from http://xecdesign.com/downloads/linux-qemu/kernel-qemu.
$ file ~/qemu-vms/2014-01-07-wheezy-raspbian.img
~/qemu-vms/2014-01-07-wheezy-raspbian.img: x86 boot sector; partition 1: ID=0xc, starthead 130, startsector 8192, 114688 sectors; partition 2: ID=0x83, starthead 165, startsector 122880, 5662720 sectors, code offset 0xb8
Take the partition 2 'startsector' value an multiply by 512, and use this figure as the offset value in the mount command below:
$ sudo mount ~/qemu-vms/2014-01-07-wheezy-raspbian.img -o offset=$((122880*512)) /mnt
Comment out the line in the /mnt/etc/ld.so.preload file and unmount:
$ sudo emacs -nw /mnt/etc/ld.so.preload
$ sudo umount /mnt
3. Run simulation.
$ qemu-system-arm -kernel kernel-qemu -cpu arm1176 -m 256 -M versatilepb -no-reboot -serial stdio -append "root=/dev/sda2 panic=1" -hda ~/qemu-vms/2014-01-07-wheezy-raspbian.img -redir tcp:5022::22
QEMU gives you a root shell, run:
$ fsck /dev/sda2
$ shutdown -r now
UPDATE: how to open ssh connection (see -redir option):
$ ssh -p 5022 pi@localhost
UPDATE: how expand free space:

1. Create /etc/udev/rules.d/90-qemu.rules with the following content and shutdown the system:
KERNEL=="sda", SYMLINK+="mmcblk0"
KERNEL=="sda?", SYMLINK+="mmcblk0p%n"
KERNEL=="sda2", SYMLINK+="root"
2. Resize the image:
$ qemu-img resize /qemu-vms/2014-01-07-wheezy-raspbian.img +4G
3. Boot up your emulator again and do:

$ sudo ln -snf mmcblk0p2 /dev/root
$ sudo raspi-config

Choose the first option to resize your disk, and it will tell you to reboot.

UPDATE: update keyboard mappings if necessary:

$ sudo dpkg-reconfigure keyboard-configuration

Monday, October 21, 2013

Propeller QuickStart board: Tips and Tricks


  • Enable the QuickStart to accept power over it's USB connection without being connected to a computer.

    When you plugged QuickStart board (and anything plugged into it) into your computer, it will get the 5v it needs for power from your computer's USB port. If you attempt to power a QuickStart from a charger or battery pack, you need to add one jumper wire to enable the QuickStart to accept power over it's USB connection without being connected to a computer. This is called /USB_PWR_EN pin. Adding a simple jumper wire to your QuickStart will enable this ability.


  • Disable auto-reset on serial connection.

    Connect a 10KOhm or greater resistor on the QuickStart header between RTS and Vdd.

Thursday, October 10, 2013

Run Sabertooth 2x5 in simplified serial mode

Recently I decided to try the Sabertooth 2x5. The simplest way would be to use serial mode.

Simplified serial mode uses TTL level single-byte serial commands to set the motor speed and direction. This provides a simple way to interface to PCs, without a need to implement a packet-based communication protocol. Motors and sabertooth

To make it more interesting I was using two motors and tracks. The serial connection was provided by the Propeller Plug.

1. Setup the Sabertooth by setting switches 2 and 4 to the DOWN position.

2. Connect a power supply, motors, the Sabertooth board and the Propeller Plug:

Propeller PlugSabertooth 2x5
RXS2
TXS1
RES
VSS0V

3. Once everything is set and ready, power the Sabertooth board and plug in the Propeller Plug.


4. Do test drive. Start first and second motors, wait for 3 seconds and stop them:
$ perl -e "print chr(127)" > /dev/ttyUSB0 && perl -e "print chr(255)" > /dev/ttyUSB0
$ sleep 3
$ perl -e "print chr(0)" > /dev/ttyUSB0
Have fun!

UPDATE: you can connect PS3 joystick and send signals from it to the Sabertooth. The following code snippet shows a simple example:

When you press UP, DOWN, RIGHT or LEFT the specified command will be sent to the Sabertooth, in this case full forward, full reverse, full forward for the right motor and full forward for the left motor respectively.

Monday, October 7, 2013

TL-WR1043ND router and Crazyradio dongle

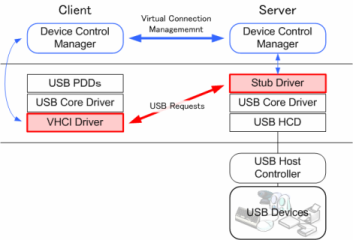
I've tired to plug in Crazyradio USB dongle each time I want to play with Crazyflie Nano Quadcopter. But now I solved this problem with help of TL-WR1043ND router that has USB port and USB/IP that allows to share Crazyradio USB dongle over IP network.


To do this, you will need to run USB/IP server on the router and USB/IP client on the workstation, where you will run Crazyflie PC client.


1. Let's assume the router has address 192.168.1.1 and OpenWrt on it.

2. Install and setup USB/IP server.

2.1. Install required packages:
$ opkg install kmod-usb-core
$ opkg install usbip
$ opkg install usbip-server
2.2. Plug in and check Crazyradio dongle. You can do this with help of lsusb (from usbutils package) or manually:
$ cat /proc/bus/usb/devices
T:  Bus=01 Lev=01 Prnt=01 Port=00 Cnt=01 Dev#=  2 Spd=12   MxCh= 0
D:  Ver= 2.00 Cls=00(>ifc ) Sub=00 Prot=00 MxPS=64 #Cfgs=  1
P:  Vendor=1915 ProdID=7777 Rev= 0.52
S:  Manufacturer=Bitcraze
S:  Product=Crazyradio USB Dongle
S:  SerialNumber=6AAD8F29EB
C:* #Ifs= 1 Cfg#= 1 Atr=80 MxPwr=100mA
I:* If#= 0 Alt= 0 #EPs= 2 Cls=ff(vend.) Sub=ff Prot=00 Driver=(none)
E:  Ad=81(I) Atr=02(Bulk) MxPS=  64 Ivl=0ms
E:  Ad=01(O) Atr=02(Bulk) MxPS=  64 Ivl=0ms
...
2.3. List devices available for USB/IP and check for Crazyradio:
$ usbip list -l 
Local USB devices
=================
- busid 1-1 (1915:7777)
1-1:1.0 -> unknown
2.4. The final step you will do with the router is to bind the Crazyradio USB dongle to the USB/IP service to share it over the network:
$ usbip bind -b 1-1 
bind device on busid 1-1: complete 
Where 1-1 can be whichever bus your device is connected to. It should tell you whether the operation is successful.

2.5. After you successfully bind the dongle to USB/IP service, start the server as daemon using command:
$ usbipd -D
usbipd: info: starting usbipd (usbip-utils 1.1.1)
usbipd: info: listening on 0.0.0.0:3240
Make sure the system is listening on TCP port 3240:
$ netstat -an
and looking for an entry like "0.0.0.0:3240" in the upper part of the output.

3. Install and setup USB/IP client.

3.1 I had a problem with Ubuntu, since usbip was disabled in the latest Ubuntu kernel configs. To fix this you can install a .deb from Debian repos  which apparently installs the .ko files and the updated userspace binaries. You will also need to load vhci-hcd module:
$ sudo modprobe vhci-hcd
3.2. Once you have USB/IP client, list the devices:
$ usbip list -r 192.168.1.1
Exportable USB devices
======================
 - 192.168.1.1
        1-1: Nordic Semiconductor ASA : unknown product (1915:7777)
           : /sys/devices/platform/ehci-platform/usb1/1-1
           : (Defined at Interface level) (00/00/00)
           :  0 - Vendor Specific Class / Vendor Specific Subclass / unknown protocol (ff/ff/00)
3.3. If you found the USB bus number you are interested in, say 1-1 in previous examples, go attach it by invoking:
$ sudo usbip attach -h 192.168.1.1 -b 1-1
3.4. Check client logs:
[  223.663627] usb 3-1: new full-speed USB device number 2 using vhci_hcd
[  223.775377] usb 3-1: SetAddress Request (2) to port 0
[  223.830212] usb 3-1: New USB device found, idVendor=1915, idProduct=7777
[  223.830223] usb 3-1: New USB device strings: Mfr=1, Product=2, SerialNumber=29
[  223.830230] usb 3-1: Product: Crazyradio USB Dongle
[  223.830235] usb 3-1: Manufacturer: Bitcraze
[  223.830239] usb 3-1: SerialNumber: 6AAD8F29EB
and server logs:
usbipd: info: connection from 192.168.1.188:60648
usbipd: info: received request: 0x8003(4)
usbipd: info: found requested device: 1-1
usbipd: info: request 0x8003(4): complete
3.5. Once this is done let's look up what USB devices are physically attached to the host:
$ usbip list -l
Local USB devices
=================
 - busid 9-1 (1915:7777)
         9-1:1.0 -> unknown
...
3.6. Once you done with Crazyflie, detach your device using the following command:
$ sudo usbip detach <PORT>
4. Run Crazyflie PC client and select proper USB device.

Build firmware from scratch for TL-WR1043ND

Simple steps to build own firmware from scratch for TL-WR1043ND router:
  1. Download latest stable OpenWrt sources:

    $ mkdir openwrt && cd openwrt
    $ svn co svn://svn.openwrt.org/openwrt/branches/backfire


    You can also use svn://svn.openwrt.org/openwrt/trunk/ to get latest unstable version.
  2. Check and install required dependencies:

    $ cd backfire
    $ make defconfig

  3. Update and install application packages:

    $ svn up
    $ ./scripts/feeds update -a
    $ ./scripts/feeds install -a

  4. Configure new firmware for your needs:

    $ make menuconfig

    Set "Target system" as "Atheros AR71xx" and "Target profile" as "TP-LINK TL-WR1043ND v1". From this point you can also add/remove any additional packages that you would like to include to your firmware, e.g. usbip.
  5. Build (this can take a while):

    $ make
Once build process has been finished you can find the firmware in the bin directory.

Friday, September 27, 2013

Unbrick TL-WR1043ND router

I was trying to switch from DD-WRT firmware to OpenWrt and accidentally bricked my TL-WR1043ND router. The only way to fix it was by using serial console and load new firmware manually.

1. Open the case and connect to the serial port (in my case I was using Propeller Plug as part of the serial cable):


2. Once this is done, you will need to connect to any LAN port and connect the power supply.

3. Now setup TFTP server with an address 192.168.0.5 (configurable with setenv command, printenv first if unsure):
$ dnsmasq --enable-tftp --tftp-root=<FIRMWARE_BIN_DIR>
where FIRMWARE_BIN_DIR is a directory with firmware.

4. Connect to the router serial port:
$ screen /dev/<SERIAL_DEVICE> 115200,-parenb,-cstopb,cs8
where SERIAL_DEVICE is your serial device, e.g. /dev/ttyUSB0. If everything was connected properly, you will see something like this:
No valid address in Flash. Using fixed address
: cfg1 0xf cfg2 0x7114
eth0 up
eth0
Autobooting in 1 seconds
5. Type and hit enter the following command to get into command prompt during this 1 second period:
tpl
6. Copy and load firmware:
> erase 0xbf020000 +<FIRMWARE_BIN_SIZE>
> tftpboot 0x81000000 <FIRMWARE_BIN_FILE>
> cp.b 0x81000000 0xbf020000 <FIRMWARE_BIN_SIZE>
> bootm 0xbf020000
where FIRMWARE_BIN_FILE (e.g. wr1043nv1.bin)  is the file name of the firmware from the FIRMWARE_BIN_DIR directory, and FIRMWARE_BIN_SIZE (e.g. 7c0000) is the size of this file.

7. Close the case.

UPDATE: TP-LINK firmware, OpenWrt firmware.

Tuesday, June 18, 2013

San Francisco housing

First of all you need to review the map of San Francisco neighborhoods and their features. Then use your favorite tool to search apartments in San Francisco, e.g. craigslistlivelovely, etc.

Tuesday, June 11, 2013

Fork a svn project from Google Code to GitHub

Clone a repo:
$ git svn clone http://<PROJECT>.googlecode.com/svn <PROJECT>
Enter the newly cloned directory:
$ cd <PROJECT>
Setup Git repository:
$ git remote add origin https://github.com/<USER>/<PROJECT>.git
$ git push origin master
Do some work and commit locally to Git. Once something is committed to SVN, rebase your local changes against the latest changes in SVN:
$ git svn rebase
$ git push

Stay tuned!

Saturday, June 8, 2013

Fork a git project from Google Code to GitHub

How to fork a git project from Google Code to GitHub:
  1. Create new repo on http://github.com as follows: https://help.github.com/articles/creating-a-new-repository
  2. Clone the project:

         $ git clone https://code.google.com/p/<PROJECT>/
  3. Set the remote origin url:
     $ git remote set-url origin https://github.com/<USER>/<PROJECT>.git
Now you can do local changes and commits. Push commits:
$ git push origin master
To stay synced, setup upstream repository:
$ git remote add upstream https://code.google.com/p/<PROJECT>/
$ git remote -v
Now you can fetch the remote repository updates from the Google Code and merge its changes into the local branch:
$ git fetch upstream
$ git merge upstream/master
Fix conflicts if necessary.

Saturday, May 18, 2013

Just another build tool

Various interesting open-source and commercial build tools:
  • Pants from Twitter.
  • Buck from Facebook.
  • You can read more about Google build system here.