
To do this, you will need to run USB/IP server on the router and USB/IP client on the workstation, where you will run Crazyflie PC client.
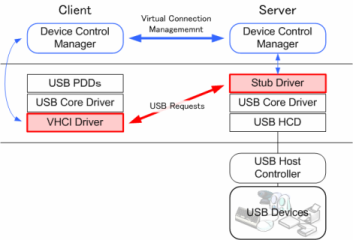
1. Let's assume the router has address 192.168.1.1 and OpenWrt on it.
2. Install and setup USB/IP server.
2.1. Install required packages:
$ opkg install kmod-usb-core2.2. Plug in and check Crazyradio dongle. You can do this with help of lsusb (from usbutils package) or manually:
$ opkg install usbip
$ opkg install usbip-server
$ cat /proc/bus/usb/devices
T: Bus=01 Lev=01 Prnt=01 Port=00 Cnt=01 Dev#= 2 Spd=12 MxCh= 02.3. List devices available for USB/IP and check for Crazyradio:
D: Ver= 2.00 Cls=00(>ifc ) Sub=00 Prot=00 MxPS=64 #Cfgs= 1
P: Vendor=1915 ProdID=7777 Rev= 0.52
S: Manufacturer=Bitcraze
S: Product=Crazyradio USB Dongle
S: SerialNumber=6AAD8F29EB
C:* #Ifs= 1 Cfg#= 1 Atr=80 MxPwr=100mA
I:* If#= 0 Alt= 0 #EPs= 2 Cls=ff(vend.) Sub=ff Prot=00 Driver=(none)
E: Ad=81(I) Atr=02(Bulk) MxPS= 64 Ivl=0ms
E: Ad=01(O) Atr=02(Bulk) MxPS= 64 Ivl=0ms
...
$ usbip list -l
Local USB devices
=================
- busid 1-1 (1915:7777)
1-1:1.0 -> unknown
2.4. The final step you will do with the router is to bind the Crazyradio USB dongle to the USB/IP service to share it over the network:
2.5. After you successfully bind the dongle to USB/IP service, start the server as daemon using command:
3. Install and setup USB/IP client.
3.1 I had a problem with Ubuntu, since usbip was disabled in the latest Ubuntu kernel configs. To fix this you can install a .deb from Debian repos which apparently installs the .ko files and the updated userspace binaries. You will also need to load vhci-hcd module:
$ usbip bind -b 1-1
bind device on busid 1-1: completeWhere 1-1 can be whichever bus your device is connected to. It should tell you whether the operation is successful.
2.5. After you successfully bind the dongle to USB/IP service, start the server as daemon using command:
$ usbipd -D
usbipd: info: starting usbipd (usbip-utils 1.1.1)Make sure the system is listening on TCP port 3240:
usbipd: info: listening on 0.0.0.0:3240
$ netstat -anand looking for an entry like "0.0.0.0:3240" in the upper part of the output.
3. Install and setup USB/IP client.
3.1 I had a problem with Ubuntu, since usbip was disabled in the latest Ubuntu kernel configs. To fix this you can install a .deb from Debian repos which apparently installs the .ko files and the updated userspace binaries. You will also need to load vhci-hcd module:
$ sudo modprobe vhci-hcd3.2. Once you have USB/IP client, list the devices:
$ usbip list -r 192.168.1.1
Exportable USB devices3.3. If you found the USB bus number you are interested in, say 1-1 in previous examples, go attach it by invoking:
======================
- 192.168.1.1
1-1: Nordic Semiconductor ASA : unknown product (1915:7777)
: /sys/devices/platform/ehci-platform/usb1/1-1
: (Defined at Interface level) (00/00/00)
: 0 - Vendor Specific Class / Vendor Specific Subclass / unknown protocol (ff/ff/00)
$ sudo usbip attach -h 192.168.1.1 -b 1-1
3.4. Check client logs:
[ 223.663627] usb 3-1: new full-speed USB device number 2 using vhci_hcdand server logs:
[ 223.775377] usb 3-1: SetAddress Request (2) to port 0
[ 223.830212] usb 3-1: New USB device found, idVendor=1915, idProduct=7777
[ 223.830223] usb 3-1: New USB device strings: Mfr=1, Product=2, SerialNumber=29
[ 223.830230] usb 3-1: Product: Crazyradio USB Dongle
[ 223.830235] usb 3-1: Manufacturer: Bitcraze
[ 223.830239] usb 3-1: SerialNumber: 6AAD8F29EB
usbipd: info: connection from 192.168.1.188:606483.5. Once this is done let's look up what USB devices are physically attached to the host:
usbipd: info: received request: 0x8003(4)
usbipd: info: found requested device: 1-1
usbipd: info: request 0x8003(4): complete
$ usbip list -l
Local USB devices
=================
- busid 9-1 (1915:7777)
9-1:1.0 -> unknown
...
3.6. Once you done with Crazyflie, detach your device using the following command:
$ sudo usbip detach <PORT>
4. Run Crazyflie PC client and select proper USB device.

