Monday, October 21, 2013

Propeller QuickStart board: Tips and Tricks


  • Enable the QuickStart to accept power over it's USB connection without being connected to a computer.

    When you plugged QuickStart board (and anything plugged into it) into your computer, it will get the 5v it needs for power from your computer's USB port. If you attempt to power a QuickStart from a charger or battery pack, you need to add one jumper wire to enable the QuickStart to accept power over it's USB connection without being connected to a computer. This is called /USB_PWR_EN pin. Adding a simple jumper wire to your QuickStart will enable this ability.


  • Disable auto-reset on serial connection.

    Connect a 10KOhm or greater resistor on the QuickStart header between RTS and Vdd.

Thursday, October 10, 2013

Run Sabertooth 2x5 in simplified serial mode

Recently I decided to try the Sabertooth 2x5. The simplest way would be to use serial mode.

Simplified serial mode uses TTL level single-byte serial commands to set the motor speed and direction. This provides a simple way to interface to PCs, without a need to implement a packet-based communication protocol. Motors and sabertooth

To make it more interesting I was using two motors and tracks. The serial connection was provided by the Propeller Plug.

1. Setup the Sabertooth by setting switches 2 and 4 to the DOWN position.

2. Connect a power supply, motors, the Sabertooth board and the Propeller Plug:

Propeller PlugSabertooth 2x5
RXS2
TXS1
RES
VSS0V

3. Once everything is set and ready, power the Sabertooth board and plug in the Propeller Plug.


4. Do test drive. Start first and second motors, wait for 3 seconds and stop them:
$ perl -e "print chr(127)" > /dev/ttyUSB0 && perl -e "print chr(255)" > /dev/ttyUSB0
$ sleep 3
$ perl -e "print chr(0)" > /dev/ttyUSB0
Have fun!

UPDATE: you can connect PS3 joystick and send signals from it to the Sabertooth. The following code snippet shows a simple example:

When you press UP, DOWN, RIGHT or LEFT the specified command will be sent to the Sabertooth, in this case full forward, full reverse, full forward for the right motor and full forward for the left motor respectively.

Monday, October 7, 2013

TL-WR1043ND router and Crazyradio dongle

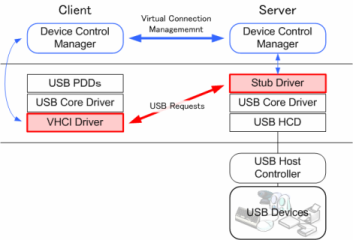
I've tired to plug in Crazyradio USB dongle each time I want to play with Crazyflie Nano Quadcopter. But now I solved this problem with help of TL-WR1043ND router that has USB port and USB/IP that allows to share Crazyradio USB dongle over IP network.


To do this, you will need to run USB/IP server on the router and USB/IP client on the workstation, where you will run Crazyflie PC client.


1. Let's assume the router has address 192.168.1.1 and OpenWrt on it.

2. Install and setup USB/IP server.

2.1. Install required packages:
$ opkg install kmod-usb-core
$ opkg install usbip
$ opkg install usbip-server
2.2. Plug in and check Crazyradio dongle. You can do this with help of lsusb (from usbutils package) or manually:
$ cat /proc/bus/usb/devices
T:  Bus=01 Lev=01 Prnt=01 Port=00 Cnt=01 Dev#=  2 Spd=12   MxCh= 0
D:  Ver= 2.00 Cls=00(>ifc ) Sub=00 Prot=00 MxPS=64 #Cfgs=  1
P:  Vendor=1915 ProdID=7777 Rev= 0.52
S:  Manufacturer=Bitcraze
S:  Product=Crazyradio USB Dongle
S:  SerialNumber=6AAD8F29EB
C:* #Ifs= 1 Cfg#= 1 Atr=80 MxPwr=100mA
I:* If#= 0 Alt= 0 #EPs= 2 Cls=ff(vend.) Sub=ff Prot=00 Driver=(none)
E:  Ad=81(I) Atr=02(Bulk) MxPS=  64 Ivl=0ms
E:  Ad=01(O) Atr=02(Bulk) MxPS=  64 Ivl=0ms
...
2.3. List devices available for USB/IP and check for Crazyradio:
$ usbip list -l 
Local USB devices
=================
- busid 1-1 (1915:7777)
1-1:1.0 -> unknown
2.4. The final step you will do with the router is to bind the Crazyradio USB dongle to the USB/IP service to share it over the network:
$ usbip bind -b 1-1 
bind device on busid 1-1: complete 
Where 1-1 can be whichever bus your device is connected to. It should tell you whether the operation is successful.

2.5. After you successfully bind the dongle to USB/IP service, start the server as daemon using command:
$ usbipd -D
usbipd: info: starting usbipd (usbip-utils 1.1.1)
usbipd: info: listening on 0.0.0.0:3240
Make sure the system is listening on TCP port 3240:
$ netstat -an
and looking for an entry like "0.0.0.0:3240" in the upper part of the output.

3. Install and setup USB/IP client.

3.1 I had a problem with Ubuntu, since usbip was disabled in the latest Ubuntu kernel configs. To fix this you can install a .deb from Debian repos  which apparently installs the .ko files and the updated userspace binaries. You will also need to load vhci-hcd module:
$ sudo modprobe vhci-hcd
3.2. Once you have USB/IP client, list the devices:
$ usbip list -r 192.168.1.1
Exportable USB devices
======================
 - 192.168.1.1
        1-1: Nordic Semiconductor ASA : unknown product (1915:7777)
           : /sys/devices/platform/ehci-platform/usb1/1-1
           : (Defined at Interface level) (00/00/00)
           :  0 - Vendor Specific Class / Vendor Specific Subclass / unknown protocol (ff/ff/00)
3.3. If you found the USB bus number you are interested in, say 1-1 in previous examples, go attach it by invoking:
$ sudo usbip attach -h 192.168.1.1 -b 1-1
3.4. Check client logs:
[  223.663627] usb 3-1: new full-speed USB device number 2 using vhci_hcd
[  223.775377] usb 3-1: SetAddress Request (2) to port 0
[  223.830212] usb 3-1: New USB device found, idVendor=1915, idProduct=7777
[  223.830223] usb 3-1: New USB device strings: Mfr=1, Product=2, SerialNumber=29
[  223.830230] usb 3-1: Product: Crazyradio USB Dongle
[  223.830235] usb 3-1: Manufacturer: Bitcraze
[  223.830239] usb 3-1: SerialNumber: 6AAD8F29EB
and server logs:
usbipd: info: connection from 192.168.1.188:60648
usbipd: info: received request: 0x8003(4)
usbipd: info: found requested device: 1-1
usbipd: info: request 0x8003(4): complete
3.5. Once this is done let's look up what USB devices are physically attached to the host:
$ usbip list -l
Local USB devices
=================
 - busid 9-1 (1915:7777)
         9-1:1.0 -> unknown
...
3.6. Once you done with Crazyflie, detach your device using the following command:
$ sudo usbip detach <PORT>
4. Run Crazyflie PC client and select proper USB device.

Build firmware from scratch for TL-WR1043ND

Simple steps to build own firmware from scratch for TL-WR1043ND router:
  1. Download latest stable OpenWrt sources:

    $ mkdir openwrt && cd openwrt
    $ svn co svn://svn.openwrt.org/openwrt/branches/backfire


    You can also use svn://svn.openwrt.org/openwrt/trunk/ to get latest unstable version.
  2. Check and install required dependencies:

    $ cd backfire
    $ make defconfig

  3. Update and install application packages:

    $ svn up
    $ ./scripts/feeds update -a
    $ ./scripts/feeds install -a

  4. Configure new firmware for your needs:

    $ make menuconfig

    Set "Target system" as "Atheros AR71xx" and "Target profile" as "TP-LINK TL-WR1043ND v1". From this point you can also add/remove any additional packages that you would like to include to your firmware, e.g. usbip.
  5. Build (this can take a while):

    $ make
Once build process has been finished you can find the firmware in the bin directory.

Friday, September 27, 2013

Unbrick TL-WR1043ND router

I was trying to switch from DD-WRT firmware to OpenWrt and accidentally bricked my TL-WR1043ND router. The only way to fix it was by using serial console and load new firmware manually.

1. Open the case and connect to the serial port (in my case I was using Propeller Plug as part of the serial cable):


2. Once this is done, you will need to connect to any LAN port and connect the power supply.

3. Now setup TFTP server with an address 192.168.0.5 (configurable with setenv command, printenv first if unsure):
$ dnsmasq --enable-tftp --tftp-root=<FIRMWARE_BIN_DIR>
where FIRMWARE_BIN_DIR is a directory with firmware.

4. Connect to the router serial port:
$ screen /dev/<SERIAL_DEVICE> 115200,-parenb,-cstopb,cs8
where SERIAL_DEVICE is your serial device, e.g. /dev/ttyUSB0. If everything was connected properly, you will see something like this:
No valid address in Flash. Using fixed address
: cfg1 0xf cfg2 0x7114
eth0 up
eth0
Autobooting in 1 seconds
5. Type and hit enter the following command to get into command prompt during this 1 second period:
tpl
6. Copy and load firmware:
> erase 0xbf020000 +<FIRMWARE_BIN_SIZE>
> tftpboot 0x81000000 <FIRMWARE_BIN_FILE>
> cp.b 0x81000000 0xbf020000 <FIRMWARE_BIN_SIZE>
> bootm 0xbf020000
where FIRMWARE_BIN_FILE (e.g. wr1043nv1.bin)  is the file name of the firmware from the FIRMWARE_BIN_DIR directory, and FIRMWARE_BIN_SIZE (e.g. 7c0000) is the size of this file.

7. Close the case.

UPDATE: TP-LINK firmware, OpenWrt firmware.

Tuesday, June 18, 2013

San Francisco housing

First of all you need to review the map of San Francisco neighborhoods and their features. Then use your favorite tool to search apartments in San Francisco, e.g. craigslistlivelovely, etc.

Tuesday, June 11, 2013

Fork a svn project from Google Code to GitHub

Clone a repo:
$ git svn clone http://<PROJECT>.googlecode.com/svn <PROJECT>
Enter the newly cloned directory:
$ cd <PROJECT>
Setup Git repository:
$ git remote add origin https://github.com/<USER>/<PROJECT>.git
$ git push origin master
Do some work and commit locally to Git. Once something is committed to SVN, rebase your local changes against the latest changes in SVN:
$ git svn rebase
$ git push

Stay tuned!

Saturday, June 8, 2013

Fork a git project from Google Code to GitHub

How to fork a git project from Google Code to GitHub:
  1. Create new repo on http://github.com as follows: https://help.github.com/articles/creating-a-new-repository
  2. Clone the project:

         $ git clone https://code.google.com/p/<PROJECT>/
  3. Set the remote origin url:
     $ git remote set-url origin https://github.com/<USER>/<PROJECT>.git
Now you can do local changes and commits. Push commits:
$ git push origin master
To stay synced, setup upstream repository:
$ git remote add upstream https://code.google.com/p/<PROJECT>/
$ git remote -v
Now you can fetch the remote repository updates from the Google Code and merge its changes into the local branch:
$ git fetch upstream
$ git merge upstream/master
Fix conflicts if necessary.

Saturday, May 18, 2013

Just another build tool

Various interesting open-source and commercial build tools:
  • Pants from Twitter.
  • Buck from Facebook.
  • You can read more about Google build system here.